How to run DotA 2 on a Chromebook
Note: This article is out of date now. I’m working on an updated version though! Subscribe to my free Substack to get an email when it’s finished:
DotA 2 is a challenging, free-to-play team game played by literally everyone*. Chromebooks are cheap and capable machines that need some coaxing to unlock their potential. Let’s bring these things together!
* figuratively everyone
 |
This guide sets you up to run any game you like from a Chromebook without running out of precious disk space.
Update: I got a good response on reddit with lots of Q&A. Check out my follow-up article with screenshots and FPS details.
Lastly if you find this useful, friend me in DotA! Here’s my Steam profile.
You will need
- A Chromebook, with:
- 4GB RAM. You really need this! The game crashes on 2GB RAM models (thanks Shootemup252 for testing).
- An Intel CPU, as opposed to an ARM CPU. Steam games are only compiled for Intel CPUs. See below for more on this.
- Enough internal disk space to install Ubuntu and the Steam client: about 3GB.
- Examples: DotA runs well on my 2013-model Acer C720. It runs beautifully on my up-to-date Dell Chromebook 13.
- An empty SD card with 32GB. Use the fastest one you can find. I use a SanDisk Ultra Class 10 card.
- To be prepared to lose your local data, i.e. everything in
Downloads. We’re going to enable Developer Mode, which will wipe your Chromebook. Make sure all of your stuff is safe in Google Drive. - Enthusiasm to learn useful stuff like Linux and the command line!
Choose your Chromebook
Which is the best?
Whichever Chromebook (with an Intel processor) has the highest Octane score and at least 4GB RAM is the best choice.
You can check the current Chromebook lineup using this excellent comparison tool.
ARM vs Intel
Your Chromebook must have an Intel (or Intel-compatible, sometimes called x86) processor. This is because Valve currently do not build their game for non-Intel chips.
This rules out:
- Samsung Chromebooks
- The 2014 Chromebooks using NVidia Tegra K1 - SAD FACE. Interestingly the K1 seems to get a much lower Octane score than Intel.
My Acer C720 from 2013 has an Intel Celeron 2955U and gets a CPU score of 11248 on Octane.
Why not a 16GB SD card?
DotA takes up 10GB, so 16GB is enough right? Sadly not. DotA will run on a 16GB card, but as soon as a patch is released you’re screwed.
When downloading and applying an update, Steam creates a downloading directory on the SD card. In here you’ll find not only the update itself - often quite small, say 250MB - but an additional copy of every DotA file that needs patched. This temporary copy of the working files takes up a ton of space, often >5GB.
With 16GB you won’t be able to update, which means you can only play in offline mode. Not much fun. Spend a few more tokens and get a 32GB card instead.
Is it secret? Is it safe?
Your Chromebook will be fine. None of the changes in this article are permanent.
If at any point you are uncomfortable and want to reset your Chromebook, reboot it and hit the space bar. This will restore to factory settings.
Here’s the plan
We’re going to:
- Put the laptop in developer mode.
- Install Ubuntu Linux.
- Configure the SD card so that you can run programs from it.
- Install Steam client.
- Install DotA to a Steam Library that lives on the SD card.
- Optimise DotA to run nicely.
- Accept high-fives from one billion angels.
1. Developer mode
First, we need to put our Chromebook in developer mode. This gives us complete control over the computer. This will wipe local data.
(If your Chromebook already runs in Developer mode, give yourself a pat on the back and go to the next section).
These steps - taken from lifehacker - should work on your machine. If not, google for developer mode and get it done in whichever way works.
- Press and hold the Esc and Refresh keys together, then press the Power button (while still holding the other two keys). This will reboot your Chromebook into Recovery Mode.
- When you see Recovery Mode pop up — the screen with the exclamation mark — press Ctrl+D. This will bring up a prompt asking if you want to turn on Developer Mode. Press Enter to do that.
- A quick reboot and another prompt screen. Press Ctrl-D again, then wait. It’ll reboot and go through the process of enabling Developer Mode. This may take 10-15 minutes.
- When it’s done, it will return to the screen saying ‘OS verification is OFF’. Leave it alone until it beeps and boots into Chrome OS.
Be aware of Developer Mode reboots
Developer mode has an odd ‘safety’ feature. Every time you reboot from being completely shut down - not just sleeping - you will be prompted with a warning screen.
- If you do nothing, or press Ctrl-D, you will boot as normal. This is what we want.
- If you PRESS SPACE, the machine will be wiped again and returned to non-developer mode. Typically you don’t want to do this : )
2. I for one welcome Linux
We’re going to get Ubuntu Linux running on your Chromebook. We’ll use a tool called crouton that does all the hard stuff for you.
When you choose to launch it, Ubuntu Linux is going to run at the same time as ChromeOS. One sits ‘behind’ the other.
You will switch between the two systems by pressing Ctrl-Alt-Shift-Forward. Back and Forward arrows are in the F1/F2 position on a Chromebook.
- Your Chromebook just started up from a factory reset, so sign in and let it finish downloading your extensions and so on.
- Check your internal disk space at chrome://quota-internals. If it’s less than 3GB, you need to do some cleaning up first. If you’re following these steps with a hard reset you’ll be fine.
- Open a Chrome Shell tab by pressing
Ctrl-Alt-T. This only works in Developer Mode. - Observe the
crosh>prompt. This ChromeOS shell only offers a few basic commands, so let’s open a real Linux shell by typingshell. - Put on your Linux trousers, we’re about to become power users. Go to your Downloads directory with
$ cd ~/Downloads. - Download the latest crouton script,
$ curl --location http://goo.gl/fd3zc --output crouton. - Let’s set up an alias to make it easier to work with the tool, with
$ alias crout='sudo sh -e ~/Downloads/crouton'. Now we can typecroutto run the script with root permissions. - Finally, install the default release of Ubuntu Linux, with
$ crout -t cli-extra,chrome,keyboard,xfce.- This will run for a little while downloading and installing Ubuntu Linux packages.
- When it’s done you’ll be prompted with
Please specify a username for the primary user. For this guide, let’s name our userubuntu. (You can pick something else, like your own first name - just remember to adjust all the commands below…) - Next,
Enter new UNIX password. Pick a password for your Linux install - nothing crazy, you’ll have to type it fairly often.
- You’re done! Linux is ready to go. Before we launch it, remember the key combination
Ctrl-Alt-Shift-Forwardto switch back and forth. Got that? OK, now start Linux with$ sudo startxfce4. - Linux will now boot using a simple GUI system called XFCE. When you’re prompted, use the default layout.
At this point you should open this article in a browser running in Linux, to make copy/pasting easy. You don’t want to type all this stuff by hand and make typos!
You can find Chrome in the Applications menu button, under the Internet category.
3. Control your SD card
When you insert an SD card, ChromeOS takes a number of steps to improve security. One step is to forbid any executable programs from running directly off the card. In Linux terms, the disk is mounted with the noexec flag.
To run a Steam Library from the card, we’ll need to mount the card with the exec flag.
(If you’re an advanced user familiar with Linux, check out my next post tuning your Chromebook SD card to format your SD card as ext4 and tune some caching parameters.)
Understanding mounts
The internal disk and the SD card are known as devices. Each device is given a name. The typical ones are:
/dev/sda1is your internal disk./dev/sdb1is your SD card.
Note: On a few Chromebooks (e.g. Asus Flip) they named things differently - you’ll need to use mmcblk0p1 and mmcblk1p1 instead of sda1 and sdb1. Check the output from mount to see what your machine uses.
In order for us to access them, these storage devices are mounted to a certain path. If you navigate to that path, you’ll see the contents.
You can learn about the current mounts using the mount command:
- In Ubuntu, right-click on the desktop and
Open Terminal here. (You can also open a Terminal from the Applications menu button.) -
Type
$ mount | grep sda1and you should see something like/dev/sda1 on / type ext4 (rw, relatime, commit=600,data=ordered) - This says that the internal disk (`sda1`) is mounted against the path `/`. The format of the disk is `ext4`. There are various flags describing how the disk can be accessed. -
Now plug in your SD card and try
$ mount | grep sdb1. You should see/dev/sdb1 on /var/host/media/removable/SD Card type vfat (rw,nosuid,nodev,noexec,...[lots more flags here]) - This means your SD card device (`sdb1`) is available at the path `/var/host/media/removable/SD Card`. The format of the card is `vfat` (a Windows-compatible format). Notice the `noexec` flag! Accessing your card through that path will not allow execution of a game program.
Update: If you see a different format other than vfat - for example, fuseblk - this means your SD card has a weird format (possibly exFAT), so:
- Use
fuseblkin the commands below instead ofvfat. - A reader reports that running
sudo apt-get install -y fuse-exfat exfat-utilswas needed before the card would automount.
Let’s add a new mount
To fix this, we’re going to mount the SD card a second time, using a different path. The contents of the card will appear on both paths, but on our new one we’ll have the exec flag and Steam will be happy.
- First, we’ll create the directory where the SD card is going to be attached in executable mode. A directory called
SDcardin our home directory is easy to find, so create one with$ mkdir /home/ubuntu/SDcard. - Now we can attach the card to a new path, with the correct flags. Try
$ sudo mount -t vfat -o defaults,nosuid,nodev /dev/sdb1 /home/ubuntu/SDcard.- This means, attach the device /dev/sdb1 to the path /home/ubuntu/SDcard. The format is VFAT. Use the default flags (which includes exec) along with a couple of others that ChromeOS prefers.
Troubleshooting:
- Again if your weirdo SD card is not
vfat, use the format you noted earlier. - If you type this in wrong,
mountwill choke and show you a long list of help text.
Our new mount should be ready. Let’s check:
-
Try
$ mount | grep sdb1, like we did earlier. You should now see two entries:/dev/sdb1 on /var/host/media/removable/SD Card type vfat (...lots of flags including noexec...) /dev/sdb1 on /home/ubuntu/SDCard type vfat (...lots of flags but noexec is gone!...) -
Now try creating a test file using your new mount, with
$ touch /home/ubuntu/SDcard/helloworld. This should complete quietly and without errors. An empty file calledhelloworldshould now be visible on the card when you flip back to ChromeOS and look at it in the Files app.
4. Let’s get Steaming
Installing Steam itself is easy. We’re going to use the command line tool apt-get - the standard way of installing stuff in Ubuntu.
Valve have already made the Steam client available in the central repository of Ubuntu programs - it’s listed simply as steam.
- Install Steam with
$ sudo apt-get install -y steam. - Steam will launch a license agreement page. Use
tabto selectOKand hit Enter. - When it’s finished, we can launch the Steam client by clicking the
Applicationsmenu button and looking in theGamescategory.- The first time it runs, the client will likely update itself.
- Relaunch Steam and sign in. You may get another client update at this point.
You’re done, Steam client is installed! Notice that the client lives on your Chromebook internal disk, but we’re not going to install games here - DotA is going to live on a Steam Library on your SD card.
5. (Older Chromebooks) Upgrade video drivers
Last I checked you need at least Mesa v10.6 for DotA to run. Most modern Chromebooks will be OK here.
Let’s verify what version of Mesa we have on my aging Acer C720:
$ sudo apt-get install -y mesa-utils
$ glxinfo|grep "OpenGL version string"
OpenGL version string: 3.0 Mesa 10.1
10.1, so not good enough. Thankfully it’s a fairly short process to upgrade. We just add a new package repository that contains the latest drivers:
$ sudo apt-get install -y software-properties-common
$ sudo add-apt-repository ppa:xorg-edgers/ppa
Now, exit Ubuntu and back in ChromeOS, update your chroot:
$ crout -u -n trusty
Once everything’s upgraded, start Linux and verify Mesa is good to go:
$ glxinfo|grep "OpenGL version string"
OpenGL version string: 3.0 Mesa 11.0.4
6. Install DotA
We’re going to create a Steam Library on your SD card.
- In Steam, go to View -> Settings -> Downloads and click the button
STEAM LIBRARY FOLDERS. - Click
ADD LIBRARY FOLDER, navigate to/home/ubuntu/SDcardand hitSELECT. Three things will happen: - Steam will confirm that the location is empty. If your SD card has stuff on it then this step will fail.
- Steam will check that this folder has exec permission - we already fixed that. If all is well,
- Steam will create a
SteamAppsdirectory there. The result should be two libraries, like this (notice my home directory is named differently):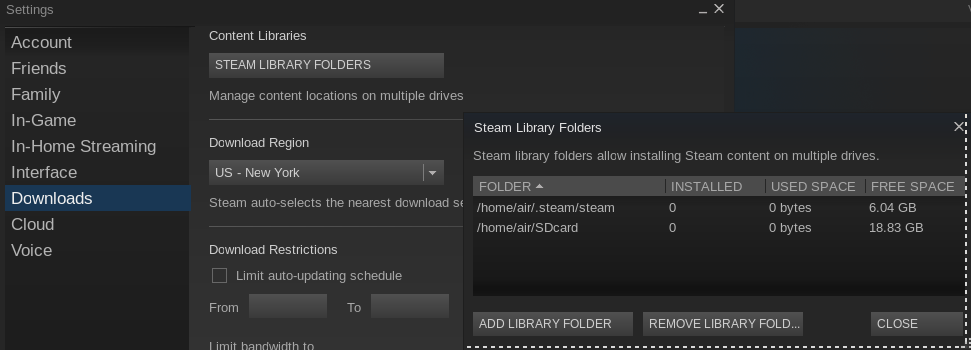
- Finally we can install DotA as normal. Find DotA in your games list and hit
INSTALL. When the install panel appears, look for the Choose location for install dropdown, andInstall under /home/ubuntu/SDcard, like so (again notice I use air instead of ubuntu):
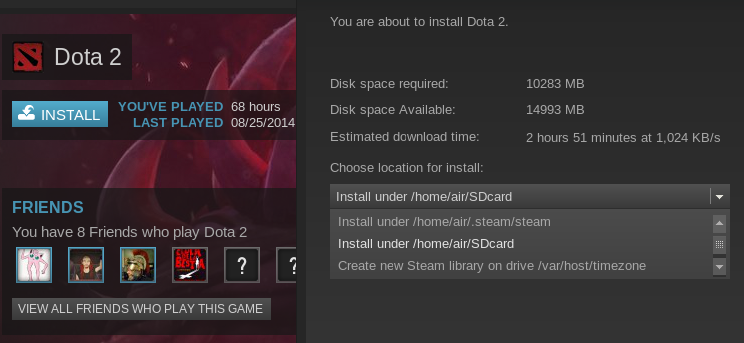
DotA will download and install! You’re good to go.
7. Optimise your DotA settings
Chromebooks are not gaming powerhouses. For the best experience, you need to downgrade all the fancy stuff.
- In Steam settings, go to
In-Gameand turn onIn-game FPS counter. - In DotA’s Video settings, turn everything off and set the
Game detailas low as possible (40%).- Lower
Game detailmakes all the 3D models look blurry in exchange for better FPS. Turn it back up if your Chromebook is getting high FPS easily.
- Lower
- Add
-novidto your Steam launch options, we don’t need to see the fat guy’s head any more.
Reminder: How to get into Linux
On rebooting, here’s a reminder of what you need to do:
Ctrl-Alt-Tto open crosh.crosh> shell$ sudo startxfce4- Make sure your SD card is plugged in.
- Open a Terminal and
$ sudo mount -t vfat -o defaults,nosuid,nodev /dev/sdb1 /home/ubuntu/SDcard - Start Steam and DotA.
Use this helper script
That step 5 is pretty annoying. In addition, when you close/open your laptop, your custom mount gets detached from the SD card. Rubbish.
To solve this I made a helper script. You should run it whenever you boot or wake your laptop:
https://gist.github.com/air/20a0c985b23684f5f6df
- Save the script as a file in your home directory, e.g.
/home/yourname/steam.sh - Edit the three params inside to match your system.
- Make it executable,
$ chmod +x /home/yourname/steam.sh - Whenever you want to run Steam, run
sudo /home/yourname/steam.shto do the mount magic and you should be good.
Tips
How do I exit Linux?
Go to Applications -> Log out. This will return you to ChromeOS.
Something else went wrong
Let me know so I can update the guide!